Here's a tut for you guys...I use PS6, but if you have a different version, it shouldn't be too different. =)
Okay, so let's take this random picture of a bus and make it look cool. xD
Bus
1) Click on the link above and right click on the image. For mozilla firefox="copy image" For Internet Explorer="copy"
-----------------------------------
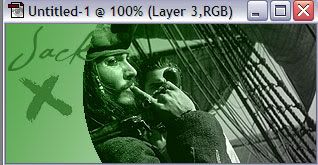
2)Now, open photoshop and create a new image. (File>New, or Ctrl+N) When you do so, the right dimensions should already be there. (8.333x5.556 in. or 600x400 pixels) Click "OK" and you should have a blank canvas. Now paste the image (Edit>Paste or Ctrl+V) onto the blank canvas, and the picture of the bus should fit perfectly into the canvas.
Screenshot
------------------------------------
Now, you're ready to do all the cool stuff. =)
------------------------------------
3) First, we will use these options (make sure your layers window is open...if not, Window>Show Layers):
Screenshot
-------------------------------------
4) What you need to do is duplicate the layer with the bus on it. To do this, drag the layer to the duplicate button (
 ) like this:
Screenshot
So you end up with this:
Screenshot
--------------------------------------
5) Now, while the top layer is selected (like in the screenshot above) click on the drop down arrow next to "Normal" and set it to dissolve. As you will notice, nothing really happened. That's okay. Sometimes dissolve doesn't make a difference, sometimes it does. It's the same with all of the other options.
--------------------------------------
6) Now, click on the drop down arrow again and select "Multiply". As you see, it made the picture darker, and the bright colors brighter. This is basically what multiply does to pictures.
--------------------------------------
7) Now, select "Screen". As you see, it made the picture lighter.
Keep selecting different options until you get something you like. Your pictures should end up something like this.
--------------------------------------
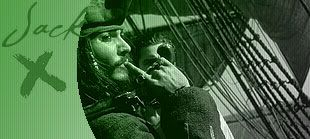
8) Now pick the one you would like to use. I'll be using "Overlay" =)
--------------------------------------
9) Now we're going to do stuff with Filters. Let's try some of my favorite ones...hmm...Go to Filter>Render>Lens Flare. You can move the flare to any spot on the picture you want, but I put it in the top right corner.
Screenshot
Tada! Now you have a picture with a lens flare.
--------------------------------------
10) Let's try something else. Go to Filter>Render>Lightning Effects. Use whatever kind of light you want and put it wherever you want it. I usually use the Default light, though. But some of the others are fun to use. =)
Screenshot
There are a bunch of other filters other than these too, and you should play around with them. You can even do stuff like, duplicate the bus layer, add a filter, and set it to one of those options we discussed above. It can add some very cool effects. =)
---------------------------------------
11) You know how lighten, darken, and color didn't do anything in step 7? Well, they will work, and they do add a very cool effect.
First, create a new layer. (Click on the arrow on the top right corner of the layers window, or click the duplicate button without dragging anything) Select a color you like...blue, for example.
Screenshot
Take the fill tool (If you don't see a paint bucket, click on the gradient tool and hold) and fill the blank layer with blue.
Screenshot
---------------------------------------
12) Now, click on the drop down arrow and set it to "Darken". What this does it fill everything that is white with the color you chose. If you don't like the color you chose, click on the color palette and choose a different color. Then, fill the top layer with that color.
Screenshot
---------------------------------------
13) Repeat step 12, but with "Lighten" (It covers all of the black areas with the color you chose) and "Color" (makes the color scheme of the picture the color you chose). These effects work really well on banners and such. =) You can also try all of the other effects with a color (Screen, Overlay, Color Dodge, etc. etc...) and see what they do.
----------------------------------------
14) Now before I end this tutorial, I want to explain a few things about brushes and textures. Brushes are textures are things you can download from the internet for free. Click on the brush on the tool window. See at the top left, where you see a soft, round dot? Click on the drop down arrow, and you will see a bunch of other 'brushes' that you could use. Here's is an example of a picture w/out and a picture w/ brushes:
Without
With
So, basically, it's the same thing you have right now (unless you've downloaded brushes already) except it's a lot fancier. When you download a brush, it usually comes in a zip file. Just open the zip file and drag the abr file inside to the desktop. When you click the drop down arrow to view all your brushes, click on the arrow on the top right corner of that window and click "Load Brushes"
Screenshot
Here is a thread filled with places you can download brushes...but be careful, some of the brushes may not be for the version/program you have. Some of them might be for Paint Shop Pro, or a higher version than the version you have. (It sux to have PS6 because a lot of sites only have brushes for PS7)
Ok now, I'll explain what textures are. Textures add color, dimension, and designs to a plain picture. For example:
Without a texture
With a texture
Here is a list of some texture resources out there...basically what you do is copy the image, paste it on top of a plain picture, and then set it to one of the options we discussed in step 7. Sometimes, the texture is too visible on the face, where you want it to be visible, so what you do to fix it is take the burn tool and make that area darker on the texture. =)
Those are some basics of PS...if you have any questions, feel free to pm me or post in this thread. There's a bunch of different effects that you can do, but it's better if you just play around with the program and make up some methods yourself. Hope this helped!
(PS--If you guys start making lots of graphics, you should join my forum and show it to me, my friends, and other pple on my forum...but its not only a graphics forum, you could do a bunch of other stuff.") We desperately need new members, lol.)
We desperately need new members, lol.)
My forum (Between the Rain Drops)
(PPS--You may want to bookmark it if you do go on, cuz its a url you cant really memorize.)
Okay, so let's take this random picture of a bus and make it look cool. xD
Bus
1) Click on the link above and right click on the image. For mozilla firefox="copy image" For Internet Explorer="copy"
-----------------------------------
2)Now, open photoshop and create a new image. (File>New, or Ctrl+N) When you do so, the right dimensions should already be there. (8.333x5.556 in. or 600x400 pixels) Click "OK" and you should have a blank canvas. Now paste the image (Edit>Paste or Ctrl+V) onto the blank canvas, and the picture of the bus should fit perfectly into the canvas.
Screenshot
------------------------------------
Now, you're ready to do all the cool stuff. =)
------------------------------------
3) First, we will use these options (make sure your layers window is open...if not, Window>Show Layers):
Screenshot
-------------------------------------
4) What you need to do is duplicate the layer with the bus on it. To do this, drag the layer to the duplicate button (
Screenshot
So you end up with this:
Screenshot
--------------------------------------
5) Now, while the top layer is selected (like in the screenshot above) click on the drop down arrow next to "Normal" and set it to dissolve. As you will notice, nothing really happened. That's okay. Sometimes dissolve doesn't make a difference, sometimes it does. It's the same with all of the other options.
--------------------------------------
6) Now, click on the drop down arrow again and select "Multiply". As you see, it made the picture darker, and the bright colors brighter. This is basically what multiply does to pictures.
--------------------------------------
7) Now, select "Screen". As you see, it made the picture lighter.
Keep selecting different options until you get something you like. Your pictures should end up something like this.
--------------------------------------
8) Now pick the one you would like to use. I'll be using "Overlay" =)
--------------------------------------
9) Now we're going to do stuff with Filters. Let's try some of my favorite ones...hmm...Go to Filter>Render>Lens Flare. You can move the flare to any spot on the picture you want, but I put it in the top right corner.
Screenshot
Tada! Now you have a picture with a lens flare.
--------------------------------------
10) Let's try something else. Go to Filter>Render>Lightning Effects. Use whatever kind of light you want and put it wherever you want it. I usually use the Default light, though. But some of the others are fun to use. =)
Screenshot
There are a bunch of other filters other than these too, and you should play around with them. You can even do stuff like, duplicate the bus layer, add a filter, and set it to one of those options we discussed above. It can add some very cool effects. =)
---------------------------------------
11) You know how lighten, darken, and color didn't do anything in step 7? Well, they will work, and they do add a very cool effect.
First, create a new layer. (Click on the arrow on the top right corner of the layers window, or click the duplicate button without dragging anything) Select a color you like...blue, for example.
Screenshot
Take the fill tool (If you don't see a paint bucket, click on the gradient tool and hold) and fill the blank layer with blue.
Screenshot
---------------------------------------
12) Now, click on the drop down arrow and set it to "Darken". What this does it fill everything that is white with the color you chose. If you don't like the color you chose, click on the color palette and choose a different color. Then, fill the top layer with that color.
Screenshot
---------------------------------------
13) Repeat step 12, but with "Lighten" (It covers all of the black areas with the color you chose) and "Color" (makes the color scheme of the picture the color you chose). These effects work really well on banners and such. =) You can also try all of the other effects with a color (Screen, Overlay, Color Dodge, etc. etc...) and see what they do.
----------------------------------------
14) Now before I end this tutorial, I want to explain a few things about brushes and textures. Brushes are textures are things you can download from the internet for free. Click on the brush on the tool window. See at the top left, where you see a soft, round dot? Click on the drop down arrow, and you will see a bunch of other 'brushes' that you could use. Here's is an example of a picture w/out and a picture w/ brushes:
Without
With
So, basically, it's the same thing you have right now (unless you've downloaded brushes already) except it's a lot fancier. When you download a brush, it usually comes in a zip file. Just open the zip file and drag the abr file inside to the desktop. When you click the drop down arrow to view all your brushes, click on the arrow on the top right corner of that window and click "Load Brushes"
Screenshot
Here is a thread filled with places you can download brushes...but be careful, some of the brushes may not be for the version/program you have. Some of them might be for Paint Shop Pro, or a higher version than the version you have. (It sux to have PS6 because a lot of sites only have brushes for PS7)
Ok now, I'll explain what textures are. Textures add color, dimension, and designs to a plain picture. For example:
Without a texture
With a texture
Here is a list of some texture resources out there...basically what you do is copy the image, paste it on top of a plain picture, and then set it to one of the options we discussed in step 7. Sometimes, the texture is too visible on the face, where you want it to be visible, so what you do to fix it is take the burn tool and make that area darker on the texture. =)
Those are some basics of PS...if you have any questions, feel free to pm me or post in this thread. There's a bunch of different effects that you can do, but it's better if you just play around with the program and make up some methods yourself. Hope this helped!
(PS--If you guys start making lots of graphics, you should join my forum and show it to me, my friends, and other pple on my forum...but its not only a graphics forum, you could do a bunch of other stuff.
We desperately need new members, lol.)My forum (Between the Rain Drops)
(PPS--You may want to bookmark it if you do go on, cuz its a url you cant really memorize.
)